Enable self-service sign-ups
This topic describes how to enable Enterprise Portal self-service sign-ups. This allows users to access your application by signing up for Trial or Community licenses through the Enterprise Portal.
For information about how your future and prospective customers can sign up for an account after self-service sign-ups are enabled, see Log In To and Use the Enterprise Portal.
Overview
You can enable self-service sign-ups through the Enterprise Portal for your application. When self-service sign-ups are enabled, current and potential customers can access your application by signing up for a trial or community license. All licenses issued through self-service sign-ups are automatically configured based on the default license policy that you configure in the Vendor Portal.
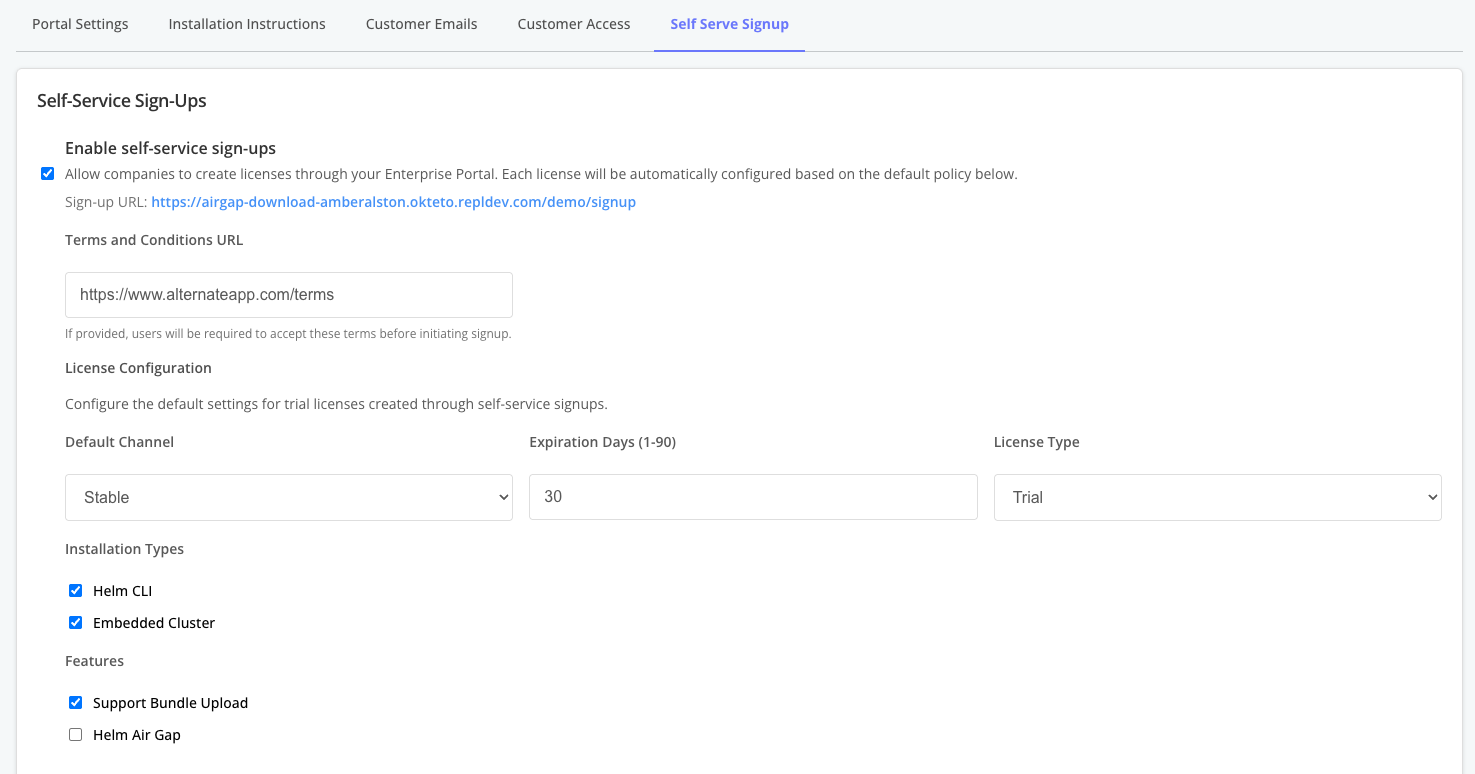
Enable self-service sign-ups
To enable Enterprise Portal self-service sign-ups:
-
In the Vendor Portal, go to Enterprise Portal > Self Serve Signup.
-
(Optional) For Terms and Conditions URL, enter a URL to the terms and conditions that the user must acknowlwedge before proceeding with signup.
-
For License Configuration, configure the default settings for licenses created through self-service signups, including the default channel, expiration date, license type (trial or community), supported installation types, and other support features. For information about customizing the Trial Signup invitation email, see Customize the Enterprise Portal.
-
Click Save.
Add custom signup fields
You can add custom fields to the self-service sign-up form to collect additional information from users, such as job title, company size, or use case. Custom fields help you qualify leads and prioritize outreach without custom integrations.
To add custom signup fields:
-
In the Vendor Portal, go to Enterprise Portal > Self Serve Signup.
-
In the Custom Signup Fields section, click Add to add a new field.
-
For each field, configure the following:
- Label: The name of the field displayed to the user on the sign-up form (for example, "Job Title").
- Placeholder: (Optional) Hint text displayed inside the field before the user enters a value.
- Required: Select this option to require users to fill in the field before submitting the sign-up form.
noteEach field is automatically assigned a unique Key based on the label (for example, "Job Title" becomes
job_title). The key is a stable identifier used in webhook payloads for your custom event notifications. Renaming a field's label does not change its key. To change a key, delete the field and create a new one. For more information about configuring webhook notifications, see About event notifications. -
Click Save.
When users sign up through the Enterprise Portal, you can view both the built-in and custom field values in the Pending Trials list in the Vendor Portal.
Share your sign-up URL
Each application has a dedicated sign-up URL where users can access the self-servive sign up. When a new user naviagtes to the sign-up page and clicks Create account, they receive an email with a 12-digit verification code. The following shows an example of a self-service sign-up page for an application:
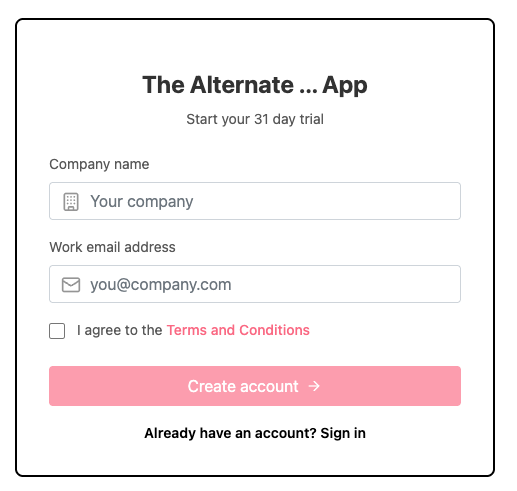
View a larger version of this image
To get the sign-up URL for your application:
- In the Vendor Portal, go to Enterprise Portal > Self Serve Signup.
- Under Enable self-service sign-ups, copy the Sign-Up URL.
View pending trials
When users request access to your application through a self-service sign-up, they are added to a list of Pending Trials. After the user confirms their account through the automated confirmation email, an active customer record is created for the user on the Customers page.
To view pending trials:
-
In the Vendor Portal, go to Enterprise Portal > Self Serve Signup.
-
Under Pending Trials, review details about any pending self-service sign-ups, including the user's email address, company, sign-up date and time, and more.
